Tuesday, November 30, 2021

Learn to Make Homemade Felted Wool Dryer Balls

Learn how to make wool dryer balls, then save time, money, and energy by tossing them in with each dryer load. They also reduce static cling!

How to Make Wool Dryer Balls

So about three years ago Matt purchased a set of felted wool dryer balls on Etsy. When he opened the package I laughed and asked why he was purchasing balls of yarn for such a ridiculous price! Then he explained the purpose of the dryer balls and asked if I would experiment with them in our laundry.

While wool dryer balls are not a new concept, I had never heard of them. Nevertheless, people have been making them for years as an eco-friendly alternative to dryer sheets and liquid fabric softeners. (Read about our homemade dryer sheets and fabric softener.) But wool dryer balls can do so much more than just eliminate chemicals from your laundry.

Benefits of Using Wool Dryer Balls

You should learn how to make wool dryer balls for all of the following reasons:

  • To begin with, wool dryer balls decrease drying time, saving you money on utility bills. Which is especially helpful in the winter months!
  • Commercial fabric softeners and dryer sheets are filled with harmful chemicals and perfumes that coat your clothing, eventually ending up on your skin. These chemicals can be especially harsh on sensitive skin. In contrast, there are no chemicals in wool dryer balls!
  • Commercial dryer sheets are costly and you must throw them away after one use. Conversely, wool dryer balls can be re-used for years, saving you hundreds of dollars.
  • Commercial fabric softeners shouldn’t be used on cloth diapers. Wool dryer balls are perfect for keeping your cloth diapers soft and chemical-free.
  • Wool dryer balls won’t affect the absorbency of your towels, kitchen cloths, or cloth diapers – commercial softeners will.
  • 100% wool dryer balls increase fluffiness and reduce static as dryer loads tumble.
  • Dryer balls help to soften clothes naturally.
  • Dryer balls are made from a renewable resource.

According to Energy.gov:

Wool or rubber dryer balls will help separate your clothes and get more air to them, cutting drying time. They can also reduce static so you don’t need dryer sheets (see #7 below). The wool balls are said to absorb some moisture, further cutting drying time. We use these at my house and have seen a noticeable difference in the time it takes our clothes to dry.[1]

How do Wool Dryer Balls work?

It’s simple. They bounce around in the dryer separating clothes, allowing more hot air to circulate through all the garments. As they tumble, the wool balls fluff your laundry, reduce wrinkles, and pummel the laundry to make it softer. They do so much more than a dryer sheet by pulling moisture out of your clothes so you don’t have to run the dryer as long. The more dryer balls you have in a load, the shorter the drying time will be.

Maybe you’re using those plastic PVC dryer balls because you don’t want the chemical scents from commercial products coating your laundry. We don’t recommend these, because plastic releases all kinds of nasty chemicals when it’s heated. Ditto for tennis balls. Wool dryer balls are a much more natural, chemical-free alternative to all the other options out there.

Don’t bother paying someone else to wind yarn into a ball for you; learning how to make wool dryer balls is simple. You can do it while watching a movie, helping kids with homework, or waiting for dinner to cook.

How to Make Wool Dryer Balls (Felted Yarn)

Choosing Your Yarn

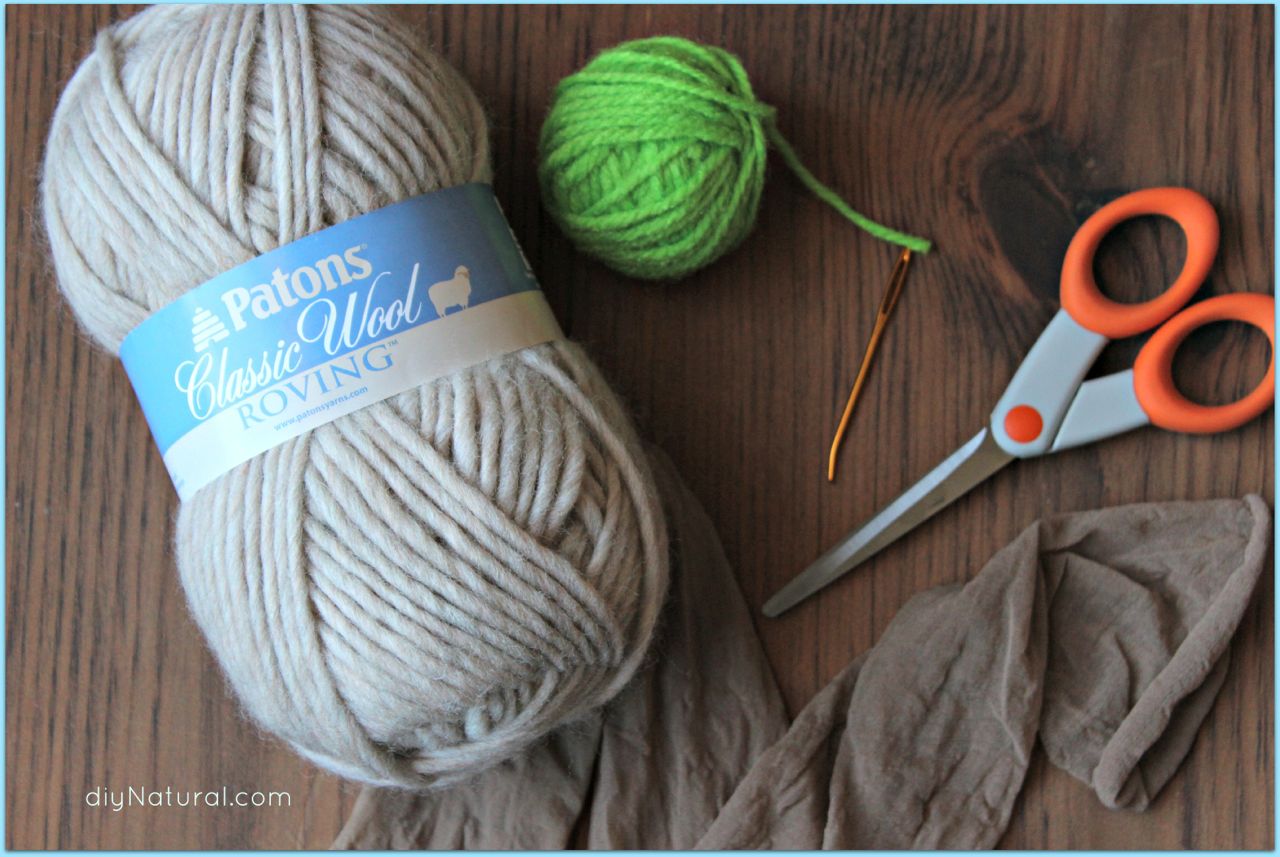
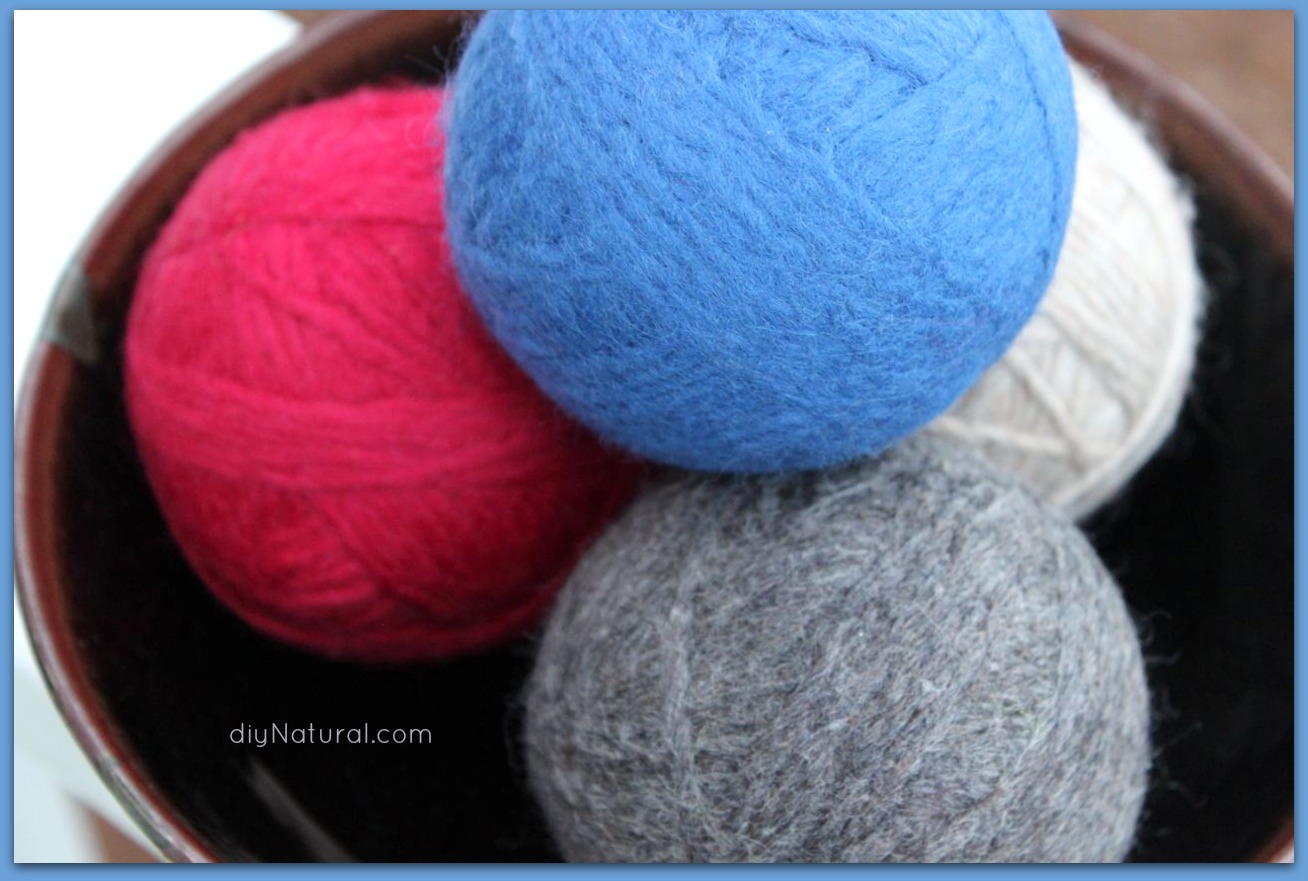
Finding the right yarn is the most critical part of making these wool balls. Look for 100% wool yarn. Most hobby stores sell it, or you can purchase it online here.

Note: Stay away from any wool labeled “superwash” or “machine washable.” This type will NOT felt.

I have successfully used many types of wool yarn to make felted wool dryer balls, but I prefer the thick, lightly spun roving yarn (pictured in beige below). It felts much better than the Fishermen’s Wool or the other tightly spun wool yarns.

Wool

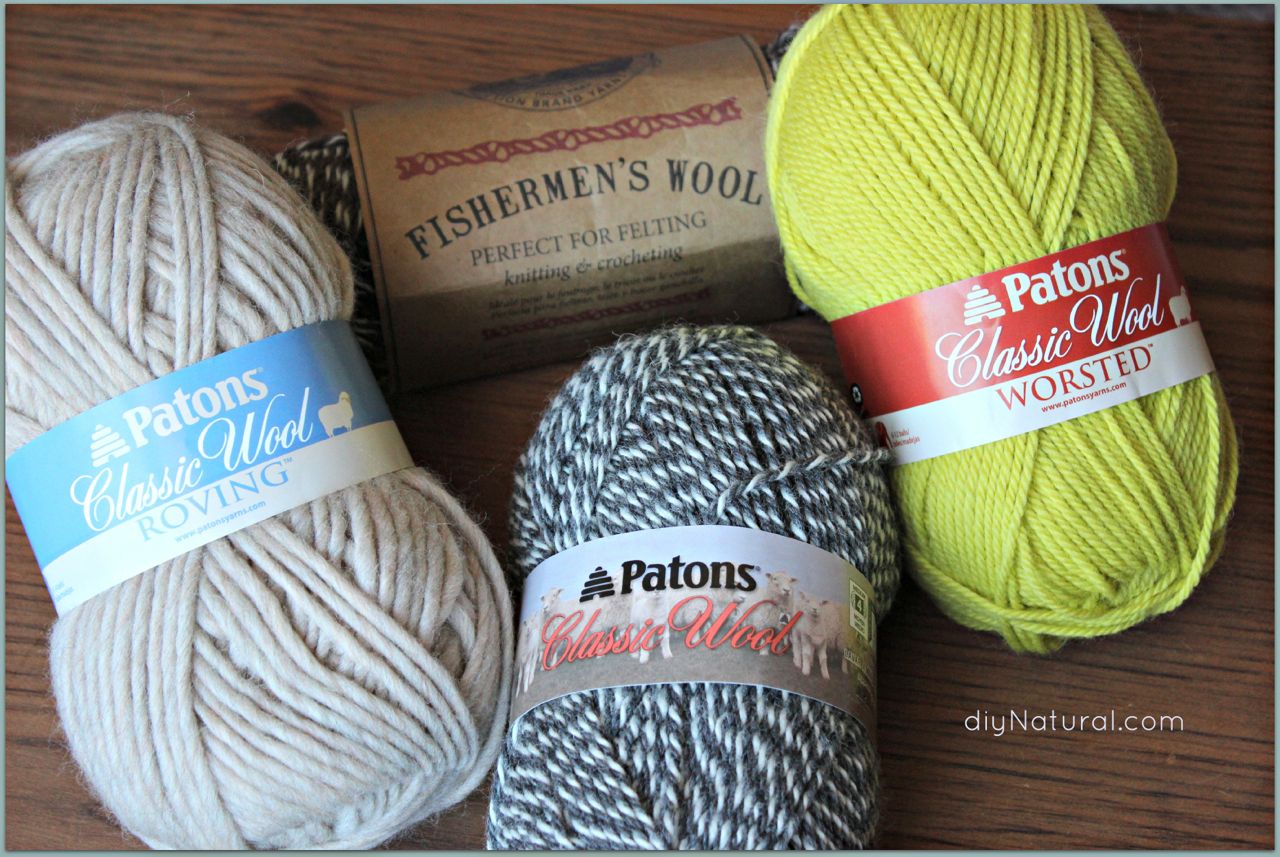
Be thrifty and “green” by unraveling an old 100% wool sweater you’re not wearing, or purchase wool sweaters at a second-hand store and use the yarn for this project (or other projects). If you use a yarn with even the slightest bit of acrylic or other blends, your balls won’t felt correct, if at all. If they are not felted, they will unravel in the dryer and you’ll have a stringy mess.

I like to use brightly colored yarn so I can easily separate the dryer balls from my clothes when coming out of the dryer. I haven’t had trouble with colors from the yarn balls bleeding onto fabrics, but you can choose lighter colors of yarn if you’re worried about this.

Supplies for Making Wool Dryer Balls

  • skein of 100% wool yarn (NOT wool labeled “superwash” or “machine washable”) – find my favorite kind here
  • scissors
  • nylons or knee-high stockings
  • blunt-tipped needle or crochet hook
  • string or cotton/acrylic yarn (to secure the wool ball in the pantyhose)

Steps For Making Wool Dryer Balls

What You Will Need

1. Begin wrapping your wool yarn around your first two fingers about 10 times.

Step 1

2. Pinch the bundle of yarn in the middle and pull off your fingers. Wrap more yarn around the middle of this bundle.

Step 2

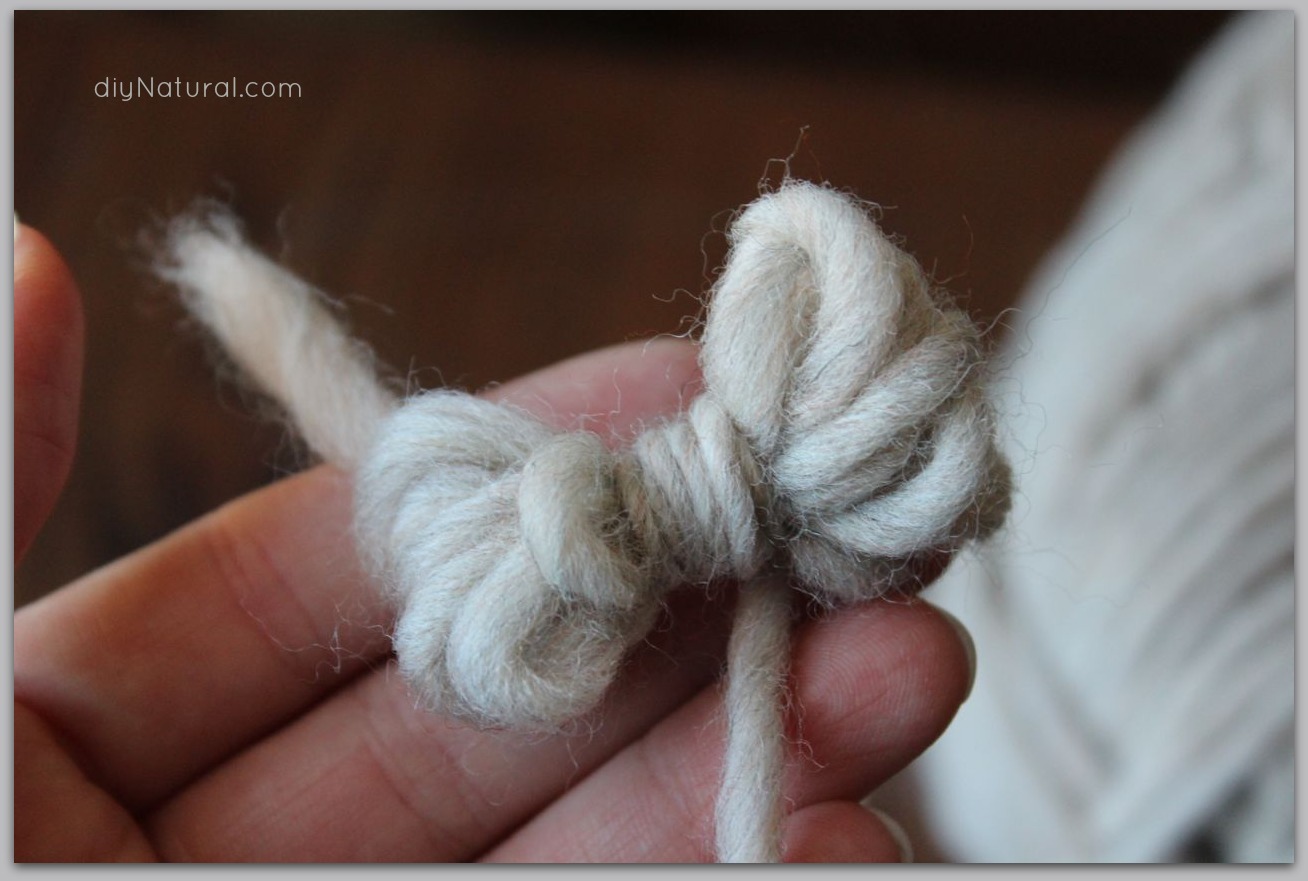
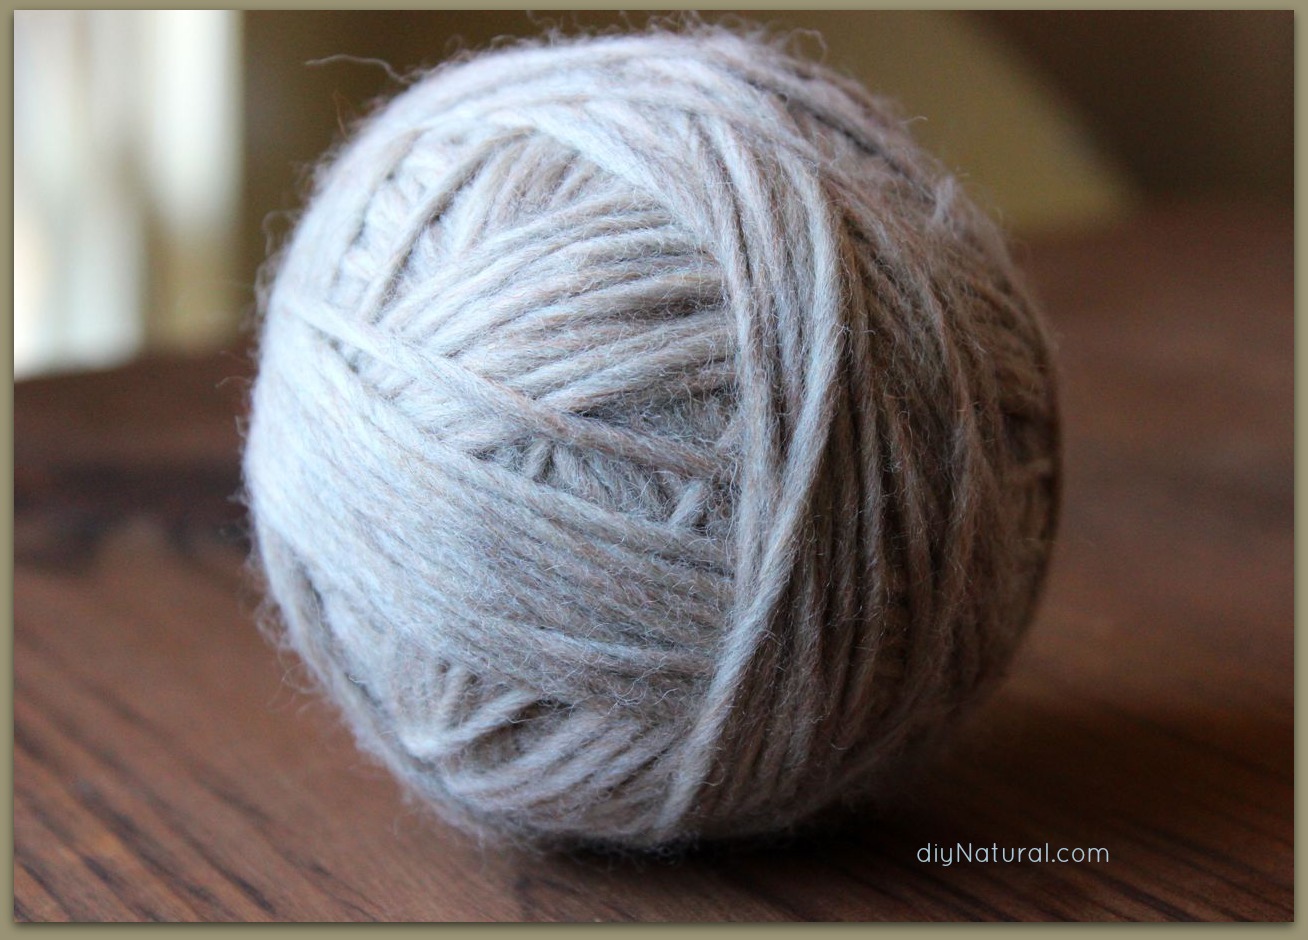
3. Wrap yarn around the entire bundle until you have the beginnings of a ball.

Step 3

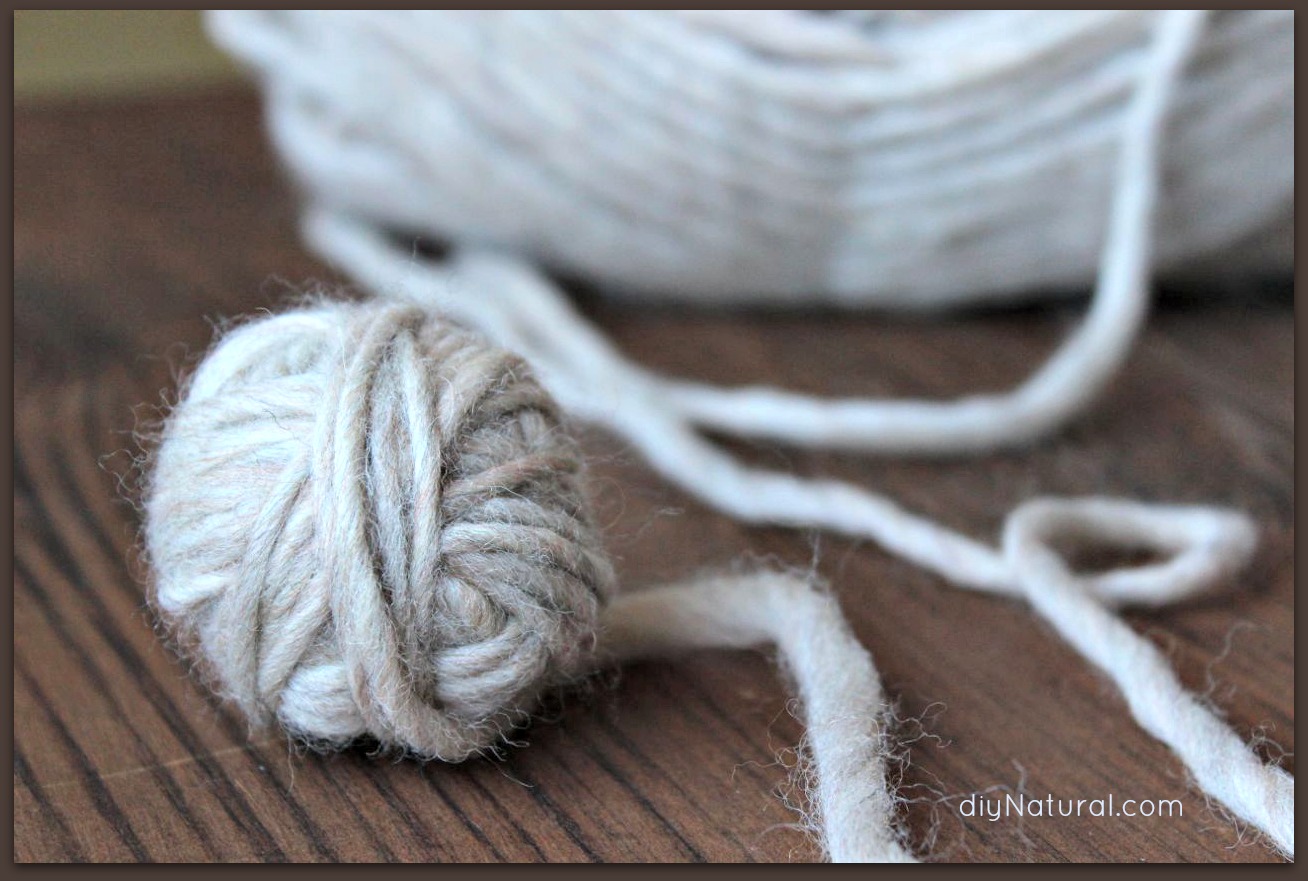
4. Continue wrapping tightly until your ball is the desired size. (I make mine softball-sized to help cut drying time more, but a tennis ball or baseball-sized will help save money on yarn. You can also fill your ball with an old, wadded-up sock or piece of fabric if you don’t want to use so much yarn.)

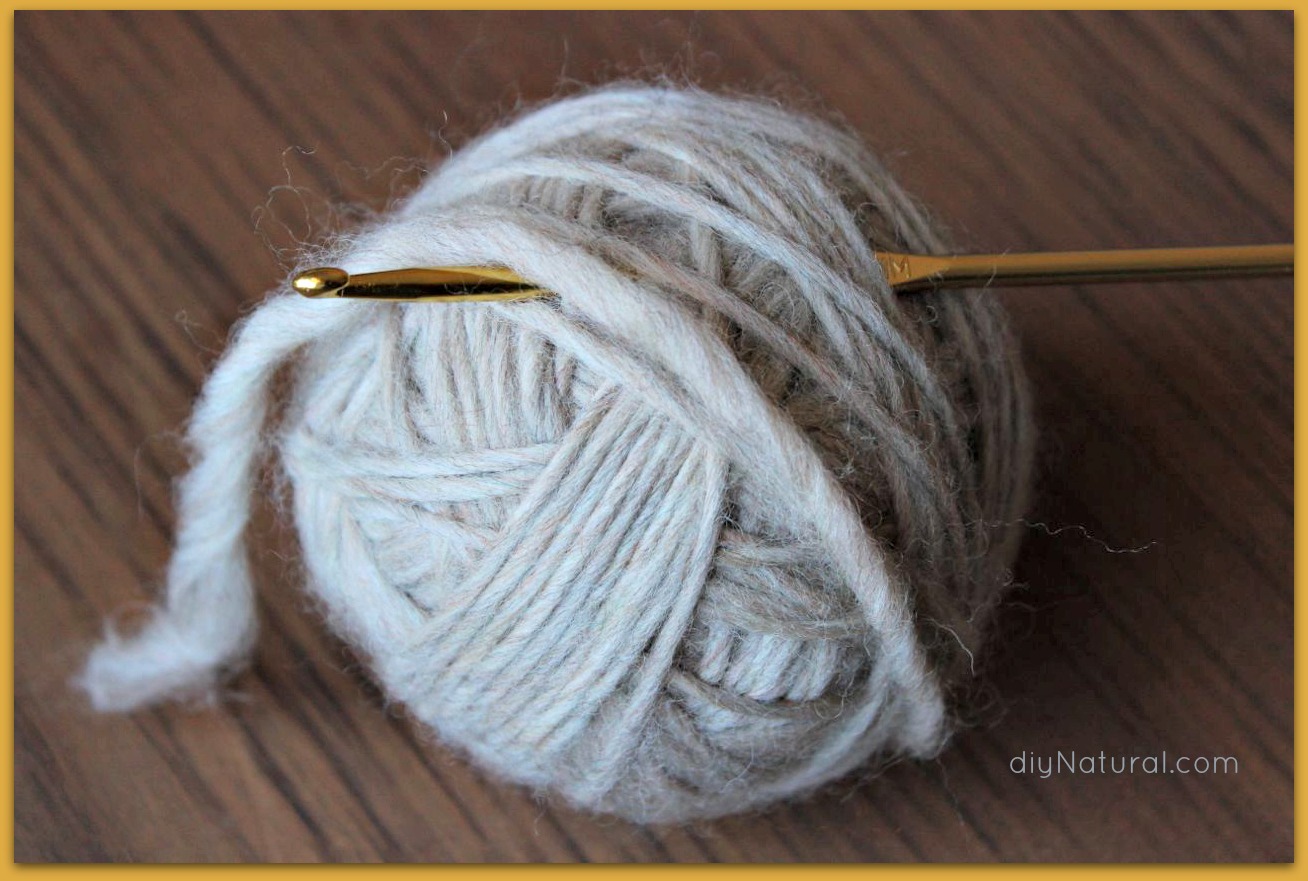
5. Use a blunt-tipped yarn needle or crochet hook to tuck the end of the thread under several layers of yarn. Pull it through and cut the end.

Wool Dryer Balls 7

Repeat these steps with more yarn until you have 4-6 balls.

Wool Dryer Balls 8

6. Cut the leg off an old pair of nylons, or use knee-high stockings. Put balls into the toe of the nylons, tying tightly in between each one with string, or cotton/acrylic yarn. (Just don’t use wool yarn or it will felt around the nylons.) Tie off the end. Take a few minutes to play with your yarn ball caterpillar if you like.
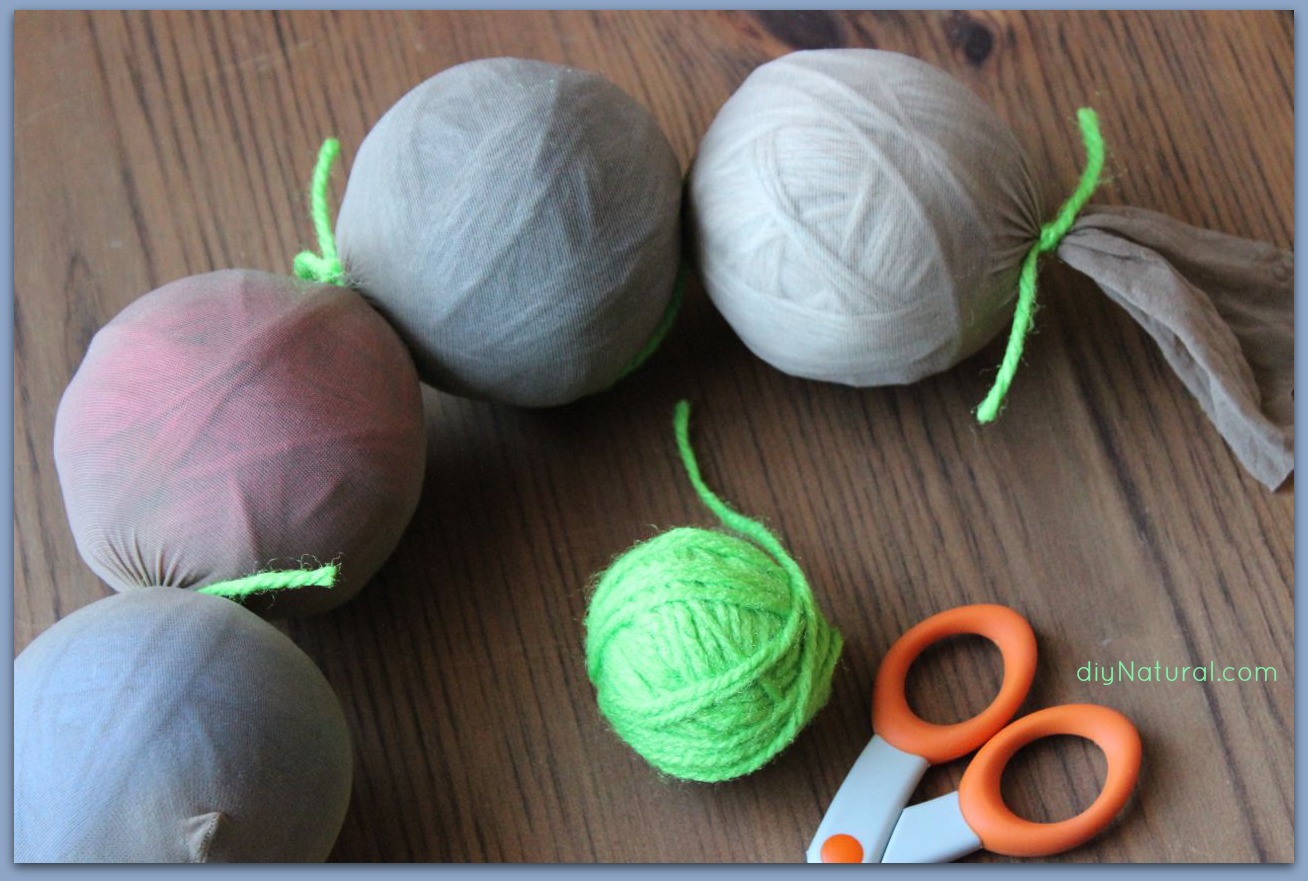
Wool Dryer Balls 9

How to Felt Them

7. Throw the entire yarn caterpillar into the wash with towels (or a load of jeans if you used brightly colored yarn).

Wool Dryer Balls 10

8. Wash in a hot wash cycle with a cold water rinse cycle. Dry your yarn caterpillar with your laundry using the hottest dryer setting.

Remove balls from nylons and check for felting. When learning how to make wool dryer balls you’ll see that some types of wool yarn will not felt well on the first try. You may need to repeat the washing and drying cycles up to 3 or 4 times. You’ll know felting has occurred when you can gently scrape your fingernail over the ball and strands do not separate.

Wool Dryer Balls 11

Using your Wool Dryer Balls

Just throw these babies in the dryer with your freshly washed clothes, and let them do their work! For regular loads, use at least 4-6 balls to notice a decrease in drying time. For large loads, use 6 or more wool balls. The more you use, the more quickly your clothes will dry.

Wool Dryer Balls 12

Store your dryer balls in the dryer between uses or display them in a basket in your laundry room.

If you want to lightly scent your laundry, add 1-2 drops of your favorite essential oil to each ball before throwing it in the dryer. If you’re using a good quality, pure essential oil, you will not have trouble with the oils spotting your clothes. (Find 100% pure essential oils here.) Just be sure to use a clear essential oil.

Love the idea, but don’t want to learn how to make wool dryer balls?

Find 100% wool dryer balls here, already made for you! (We recommend purchasing 2 packs.)

Do you know how to make wool dryer balls? Are you using them in your laundry? Share any experience you have with the community!

*******

Sources

  1. Dennis Schroeder. 16 Ways to Save Money in the Laundry Room. February 14, 2018. Energy.gov

Learn to Make Homemade Felted Wool Dryer Balls was written by Betsy Jabs.


* This article was originally published here

Sunday, November 28, 2021

Greener Shopping Difference Maker: Jiminy’s Dog Food & Treats

Jiminy’s cricket- and grub-protein dog foods and treats are an effective choice to transform your… The post Greener Shopping Difference Maker: Jiminy’s Dog Food & Treats appeared first on Earth911.

Here is the original:
Greener Shopping Difference Maker: Jiminy’s Dog Food & Treats


* This article was originally published here

Thursday, November 25, 2021

A Simple and Natural DIY Bubble Bath Bar Recipe

This DIY bubble bar recipe contains simple nourishing ingredients to make your bath bubbly, and leave your skin soft, silky, and smooth.

I love to take baths!

Most of the time I take a shower, just for convenience and to save water, but now and then I like to indulge in a long soak. I’ve used bath salts, scrubs, bar soap, and liquid soap, but I’ve come across a solid soap that’s soft, yet firm. Furthermore, it’s packed with great ingredients for your skin!

Bathing With Safe Ingredients

Most bubble bar recipes on the market are made from SLSA or sodium lauryl sulfoacetate, which is much safer for your skin than sodium lauryl sulfate. That being said, both are chemicals that can irritate your skin to some degree, and SLSA is a very fine powder. When using it, you need to wear a mask, or it can get into your nose and sinuses. Due to these issues, I’ve created a much safer recipe that doesn’t contain SLSA.

DIY Bubble Bar Recipe
Print

DIY Bubble Bar Recipe

This DIY bubble bar recipe contains simple nourishing ingredients to make your bath bubbly, and leave your skin soft, silky, and smooth.
Prep Time 15 minutes
Cook Time 45 minutes
Drying Time 3 days
Total Time 3 days 1 hour
Servings 16 ounces
Author Debra Maslowski
Cost $5

Ingredients

Instructions

  • Begin this bubble bar recipe by sifting all of your dry ingredients together to be sure there are no lumps. Add the melted butter and oil and stir well. You may want to put gloves on to mix it well. Add the soap in a little at a time, mixing well after each addition. Drip the color and mix well, or divide the mixture into two or three bowls and color each one separately. Add the essential oil and mix it in. You should have a dough-like mixture. If it’s too dry, add a bit more liquid soap. You can also add a bit more cornstarch or arrowroot powder if it’s too wet.
    ¼ cup non-GMO cornstarch, ¼ cup citric acid, 1 cup baking soda, ¼ cup milk powder, ¼ cup cocoa butter, 2 Tbsp sweet almond oil, 1 Tbsp natural liquid soap, a few drops natural food coloring, 8-10 drops essential oil
  • Turn out onto a powdered surface and knead like bread dough. When it gets firm, you’re ready for the next step.
  • Shape the bubble bar recipe bars any way you like. You can layer colors, roll them into a log, and cut them to the desired size. It can also be shaped into balls. Try adding bits of each color to the balls as you are shaping them for a fun effect. I like to make mine into “truffles.”
  • Finally, let your DIY bubble bar dry out for 2-3 days. Once they are thoroughly dry, place them in a jar with a tight-fitting lid. These will keep for a few months unless you use them up before then!

Video

DIY Bubble Bar Recipe 1

To Create Fun Shapes

Simply mold the DIY Bubble Bar like clay to make them into any desired shape. (Check out this unique bar.)

This bubble bar recipe looks fun in the shape of a scoop of ice cream (see some here). To make, pack the mixture into an ice cream scoop. Mix colors to create a swirled ice cream effect. Next, press the lever and gently place the scoop onto a sheet of parchment paper. This works best with an ice cream scoop with a trigger. This will give you ridges that look like real ice cream. Finally, dust with glitter if you like. There are several colors of biodegradable glitter that can be used (find it here).

Using your DIY Bubble Bar

This bubble bar recipe is easy to make and use. You can either place the whole thing in the bathtub with the water running or pinch off a piece and hold it under running water to create bubbles. You might need to rub your hands together a bit to soften up the bar. Another method is to place the bar in a muslin bag and hang it so it is in contact with the running water.

Since you’ll get plenty of bubbles from using a small amount, I’ve never needed a whole bar for a bath. You can hold it under running water just until you have enough bubbles, then dry out the remaining bar to use during your next bath.

Do you take baths? What is your favorite way to create natural bubbles in the tub? Do you have a bubble bar recipe to share?

*******

A Simple and Natural DIY Bubble Bath Bar Recipe was written by Debra Maslowski.


* This article was originally published here

Wednesday, November 24, 2021

Learn How to Make Pumpkin Puree for Pumpkin Pie!

Learn how to make pumpkin puree for use in pumpkin pie this year! It’s simple, delicious, and you can even freeze it for use all year long.

Nothing says autumn like a big pile of orange pumpkins!

This is the time of year when those beautiful gourds are ubiquitous: they’re on front porches, in giant crates at the grocery store, and brightly adorning roadside farm stands. Everything is pumpkin flavored too, but I have to admit that I find that rather less refreshing. Pumpkin-flavored stuff usually doesn’t have an ounce of pumpkin in it – it’s all about the spice blend used. It’s all good and well if you love the taste of nutmeg and cloves, but real pumpkin deserves some attention too.

While carrots usually get all the credit for providing beta carotene, pumpkins are also high in this nutrient. Beta carotene is important because your body converts it to Vitamin A. Vitamin A is important for eyesight, your immune system, and healthy skin. Plus, pumpkins are full of fiber. It can be hard to find foods that taste good, are low-calorie, and have fiber, too. Pumpkin fits all three of those requirements! Pumpkin seeds are also incredibly healthy; they contain zinc, fiber, magnesium, protein, and more. When you stop to think about all of the nutrition you can find in a simple pumpkin, you’re going to wonder why you’ve been using this superfood solely as a porch decoration for so long.

While there are several ways to eat pumpkins, I find the simplest way to start is to turn them into a puree. It’s a simple process, and at the end of it, you’ll have plenty of pumpkin puree to store in your freezer for the coming months.

How To Make Pumpkin Puree 1

How to Choose Pumpkins

Did you know that there are dozens of varieties of pumpkins? It can be overwhelming to choose the best type to preserve. Technically, you can use any variety of pumpkins that you like, but some are certainly better than others. Smaller pumpkins tend to be sweeter, and therefore make tastier purees. These are often referred to as pie pumpkins.

If you’re going to grow your own pie pumpkins, look for varieties like New England Pie, Sugar, or Baby Pam. Growing your own pumpkins is fun and rewarding, but if you don’t have garden space or your crop doesn’t turn out, you’ll have to look elsewhere. This year we bought ours at our local farmer’s market. Pumpkins are not always labeled by variety, so we just looked for the healthiest small pumpkins we could find. Pie pumpkins are smaller, rounder, and have longer stems than jack-o-lantern pumpkins.

So you know how many to buy, keep in mind that I used five pumpkins and ended up with a gallon (16 cups) of pumpkin puree. It’s probably a good idea to start out with two pumpkins if this is your first time.

How To Make Pumpkin Puree and Freeze It

Once you have picked or purchased your pie pumpkins, you’re ready to turn them into a puree!

How To Make Pumpkin Puree 2

Step 1:

After you wash the pumpkins, cut them into rough quarters. My favorite method is to cut down, from top to bottom, leaving a square around the stem. The pieces aren’t quite even, but it’s easy to cut that way, and most of the waste is in the middle. That’s less scooping for you!

Clean the Pumpkins

For the remaining pieces, scoop the insides out and set them aside. You can also take this time to separate the seeds out from the rest of the pulp (your hands are already slimy and sticky, so it’s a good time to do it), or you can wait and do that at the end of your project. (Once you’re finished, make sure to wash, season, and bake your seeds. They make a great snack!)

Be prepared: this is a fairly time-consuming, messy process. Make sure you rinse your hands frequently because slippery hands and big knives do not make for a happy combination.

Sliced Pumpkin Pieces

Step 2:

Once you’re done cleaning and quartering your pumpkins, it’s time to put them on cookie sheets. They will drip as they cook, so this protects the bottom of your oven. Put them in the oven and cook them at 350° for 45 minutes or so. You can use the old stick-a-fork-in-it method to determine doneness.

Step 3:

Once your pumpkins finish baking, separate the flesh from the peel. Put the flesh into a food processor or blender and process until smooth. Depending on how many pumpkins you are pureeing, this may take several batches.

Finished Puree

Step 4:

Prepare for freezing. You can use plastic freezer bags, but the safest method would be to use glass jars or other glass freezer containers. Decide ahead of time how much you will place in each container. I recommend one cup per container, but you should use whatever safely fits in your container and/or what you foresee to be the amount you will most frequently need.

A note when freezing in glass jars: Use canning jars, not recycled glass jars. Canning jars are thicker and less likely to break when food expands as it freezes. To further prevent breakage, leave headroom in your jars so that your food has room to expand upward.

Why You Can’t Can Pumpkin Puree

I have a feeling, one of the first questions you’ll ask is, “Can we can this pumpkin puree?” I wish it were a possibility to do so, but the USDA recommends against it and has since 1989. The two main reasons are the thick consistency of pureed pumpkin and the low acidity of the fruit. Combining those two things mean it’s impossible to guarantee that you can kill all of the botulism spores when processing. So, for better or worse, it is best to freeze pumpkin purees.

How Should I use Pumpkin Puree?

If you’ve never made pumpkin puree before, you might not have thought about all the ways you can use it. Here are a few ideas:

What’s your favorite way to use pumpkin puree?

*******

Learn How to Make Pumpkin Puree for Pumpkin Pie! was written by Emry Trantham.


* This article was originally published here

Tuesday, November 23, 2021

Find the best eco-friendly deals for Black Friday here

Before you throw in the towel on your good intentions to shop conscientiously this season, check out these deals we’ve rounded up that are sure to get you headed in the right direction. Ella Ola If you’re looking for  plant-based  skincare for the smallest family members, you’ll find a great Black Friday deal at Ella Ola. All products are free of parabens, phthalates, sulfates, oxybenzone, steroids, synthetic fragrances, PEGs, dyes, formaldehyde releasers and propylene glycol. Enter code SALE20 at checkout. It will be active from Nov. 26-29. Related: 9 tips for eco-friendly Black Friday, Cyber Monday shopping Allyoos For hair care stocking stuffers, look to this plant-based brand at a discount. Enter code LOVEMYHAIR25 on the Allyoos website for 25% off your entire order now through Nov. 26. Shop Allyoos Shampoo and Conditioner on Amazon Little Spoon It’s the season of special treats in the  food  and drink department, so include the babies and toddlers in the occasion with organic, non-GMO baby food and healthy finger foods for toddlers. Use code BLACKFRIDAY4LIFE to get 50% off your first box of Babyblends or Plates plus free meals in every order for life. Promo ends Nov. 29. Dropps This is one of our favorite laundry and dishwasher pod brands. They offer a variety of scents and an ever-expanding line of products. Plus, the company has entertaining advertising. They don’t take themselves too seriously, but they do put a critical eye on protecting the  environment . Use code BF2021 at checkout for a 30% discount on the Dropps website. Ends Nov. 28.  Shops Dropps Laundry Detergent Pods on Amazon Pact As far as organic clothing goes, Pact is one of the most affordable brands out there. It offers a breadth of clothing options from bras to leggings to tees and hoodies. Grab a discount from Nov. 22-29 with deals like all bedding 30% off, all bath 40% off, men’s and women’s socks at 50% off, men’s sleepwear 25% off, and goods for baby and kids starting at 30% off. Soothi Journals Each journal is made from repurposed leather and tree-free paper, for an eco-friendly gift-giving option that can be personalized with your choice of saying on the front. Soothi gives back to the planet by planting one tree for each sale. Plus, they’ve got some good deals going. Use code CELEBRATE to take 25% off your entire order. Or buy one and get one 40% off with code 1FORME1FORYOU. A third option is to buy two journals and receive a free tote bag with code GIFTME. Check out the site for more! Shop Soothi Journals on Amazon Essentia Mattresses If you’ve been in the market for a new mattress and have scouted out environmentally-friendly brands, you may have run across Essentia, the first natural memory foam mattress on the market. For Black Friday, it’s offering 25% off the entire store, including organic mattresses, organic pillows, foundations, kid’s items, pet beds and more. With the purchase of a Lifestyle, Performance, or Wholebody Recovery mattress, you’ll also receive two free organic pillows ($300 Value). Essentia offers free shipping, a 120-Night mattress sleep trial, and a 20-year mattress warranty. Sale ends Nov. 28. Novica Novica is a marketplace that brings together producers and buyers around the globe. All products support the mission to celebrate individual artisans making hand-crafted items. There’s a vast range of options from housewares to fashion to jewelry. Use code SAVE10 for $10 off $50 or code SAVE15 for $15 off $100. Code SAVE25 takes $25 off $150. All codes are valid Nov. 22-27. Mightly Organic kids clothing brand Mightly is fair trade certified and offering a discount on those picture-perfect Christmas morning pajamas. Use code PJBOGO for buy one get one half off all pajamas on Black Friday (Nov. 26) and Cyber Monday (Nov. 29). Shop Mightly on Amazon EarthHero This is where the planet’s superheroes shop for gifts. Each item offers details of the sustainability aspects. Every product is so carefully curated, EarthHero is calling it Green Friday instead of Black Friday. Find books, bags, cookware, clothing,  plastic alternatives, cleaning products, camping supplies and countless other items. Get shopping with code BF2021 for 20% off sitewide. Five trees will be planted for each order. Code is valid Nov. 15 through Dec. 1. United by Blue With sustainable practices at its core, United by Blue has earned B-Corp certification. Choose innovative, recycled, eco-friendly and  natural materials  like BisonShield™, SoftHemp™, EcoKnit™, (R)evolution™ and EcoDry™. The company manufactures all types of clothing for men and women, including accessories and shoes. There is also an assortment of household items, from books to candles to rugs and more. Discounts have already begun with 20% off regular-priced items sitewide through Nov. 29 (no code needed). From Nov. 24 through Dec. 5, take an additional 50% off sale items with code TGIF. Shop United by Blue on Amazon Xtrema Choose from all sizes, shapes and styles of 100% ceramic, non-toxic cookware . If you’re ready to invest, Black Friday (Nov. 25-28) is a good time to do it. Take 25% off everything, and they’ll throw in free shipping for orders over $75. Made Trade It’s all about fair trade at Made Trade. All products on the online marketplace are sustainably and ethically made. This women-owned business is both Carbon Neutral Certified and a member of 1% For The Planet. You can use the filter to scout out products made from  recycled materials  and scan for information regarding the types of owners, whether it’s fair trade, and more. You choose whether to take a discount or give back your savings. Take 10% off your order with code GET10, or give 10% with code GIVE10. Donations go to The Giving Grove, a nonprofit that plants urban orchards to provide food-insecure communities access to fresh, nutritious food. Codes are valid Nov. 26-29.  Via Conscious Life and Style , Mindful Momma   Lead image via Pexels  Images via Ella Ola, Dropps, Soothi, Mightly, and Xtrema When you purchase through links on our site, we may earn commissions at no cost to you.

Read the original post:
Find the best eco-friendly deals for Black Friday here


* This article was originally published here

Sunday, November 21, 2021

An Effective All Natural Homemade Jewelry Cleaner

This homemade jewelry cleaner is simple and effective. Commercial cleaners are expensive and full of chemicals, DIY jewelry cleaner is not.

Though I love to browse Etsy and Pinterest and admire all the artsy jewelry, I don’t consider myself a big jewelry person.

Wearing Jewelry All the Time

I rarely wear anything more than my wedding rings, a pair of stud earrings, and a simple necklace. I also sleep and shower in all of my jewelry. That may surprise you, but if you lost things as often as me you’d understand. I’ve lost too many of my little treasures over the years, and do not want my wedding rings to be added to that list.

Cleaning My Jewelry Often

The problem I have with wearing all of the same jewelry all the time is that it doesn’t take long for my pieces to lose their sparkle.

The rings have it the worst. I garden, make biscuits, clean out the chicken coop, change diapers, and do all sorts of other stuff with my hands. My rings catch a lot of grime from all of that activity, so they require regular cleaning.

Since commercial cleaners can be expensive and are full of strong chemicals, I prefer to work with a natural, homemade DIY jewelry cleaner. I’ve been using different methods for several years now, and this is what I’ve found to be most effective.

Homemade Jewelry Cleaner
Print

Homemade Jewelry Cleaner Recipe

This homemade jewelry cleaner is simple and effective. Commercial cleaners are expensive and full of chemicals, DIY jewelry cleaner is not.
Prep Time 5 minutes
Cook Time 2 minutes
Soaking Time 1 day
Total Time 1 day 7 minutes
Servings 1 batch
Author Emry Trantham
Cost $1

Ingredients

Instructions

Swirl, Soak, Scrub

  • Put the jewelry in a glass mason jar.
  • Cover with a ½ cup of vinegar or witch hazel. Add 3 drops of tea tree oil and swirl to mix.
  • Allow jewelry to soak in the mixture overnight.
  • The next morning, coat with baking soda and scrub with an old toothbrush, then rinse with water.

Video

Notes

This cleaning method is intended for jewelry with sturdy stone settings.
Homemade Jewelry Cleaner 2

Results of This Homemade Jewelry Cleaner

The first evidence you’re going to have that this homemade DIY jewelry cleaner worked will be all the stuff floating around in your vinegar/tea tree oil liquid. The last time I put my jewelry in this mixture I didn’t think it was too dirty, and it didn’t exactly need cleaning. Within just a few minutes, though, there was so much stuff floating around in the water that I was appalled.

Your jewelry will be noticeably cleaner after just the soak. It will even be disinfected, too. Adding the baking soda scrub at the end will ensure that you get everything clean, especially in all the little crevices. If your kitchen faucet has a high-pressure setting, that will be the best thing to use for rinsing your jewelry. Just make sure you hold on tight, because searching for lost objects in the sink trap or garbage disposal is one of the least pleasant tasks in the world. Take my word for it. Consider using a strainer.

Personally, I love the feeling of wearing newly-cleaned, sparkly jewelry. If you find that you keep gazing at your rings and getting kind of lost in the sparkle, you’ll know that you’ve done a good job of cleaning them. And you’ll enjoy that look until the next time you make biscuits, put on lotion, or make your kids play-dough.

Good thing this homemade jewelry cleaner is such a simple recipe, you’ll probably be using it often!

Explanation of Ingredients

I’ve used both witch hazel and vinegar for cleaning my jewelry.

Witch hazel is slightly acidic, and vinegar is much more so, but either will work for soaking your jewelry. This cleaning method is intended for jewelry with sturdy stone settings (I wouldn’t use it for opals, pearls, or tanzanite, for example), and that is especially important to keep in mind if you’re using vinegar. Witch hazel is certainly the milder of the two, so use whichever ingredient you feel comfortable with.

Tea tree oil is a known disinfectant and anti-fungal. It isn’t completely necessary to add to your jewelry cleaner, but as I said above, my jewelry can get pretty gross. A small drop of tea tree oil adds a real antiseptic boost to this homemade jewelry cleaner, so I’m happy to add it. Like I said – I’ve cleaned the chicken coop wearing my wedding rings. I’ll take all of the natural antiseptic power I can get. (For more information and other uses for tea tree oil, read this.)

Baking soda is a slightly abrasive, inexpensive scrubbing tool. Unlike the ingredients listed above, it’s basic rather than acidic. Baking soda is especially good for tarnished silver, but should never be used on aluminum. I find it works wonders on my diamond rings.

Have you ever made a homemade jewelry cleaner? How did it work for you?

*******

An Effective All Natural Homemade Jewelry Cleaner was written by Emry Trantham.


* This article was originally published here